How to move to online teaching (fast)
- Maciej Workiewicz
- Mar 14, 2020
- 14 min read
Updated: Jun 23, 2021
A good external camera. I recommend Logitech C920 or Logitech C922. C922 is more expensive but performs better in low light. Both will give a clear video feed and have good microphones. If you want to go higher still, Logitech BRIO is probably the best camera with a USB interface that you can buy right now. It has 4K resolution, HDR, 90-deg FOV, Windows Hello support, and very good microphones. You can immediately tell a difference, especially in a low-light situation or with high contrast. To get something better, you would have to start hooking up more professional digital cameras and start fiddling with more advanced settings.
Updated on Sept 21, 2020 (the most recent updates at the bottom)
Note: This is a live post and I will keep updating it with more information and advice. Please don’t hesitate to email me with your comments. I will be happy to incorporate them.
In my approach I chose to focus on Zoom 😊 In my opinion it is one of the best conferencing tools for online education (I have no shares in this company nor have I received any support from them). You will need to have a Pro account to go beyond the 40-minute limit of the Basic package. Furthermore, depending on the hardware situation (more on that later) one can see up to 49 simultaneous video streams of session participants. Many world’s top institutions are using it as a go-to solution, including mine (ESSEC Business School). However, there are many other products of this kind and they all have similar functionalities and if your institution already has chosen a provider or you are comfortable with another product, then use that instead. The most important is that you and your students are comfortable with the tool.

In this post, I want to share some advice on how to quickly transition to online teaching and to document my experience with setting up an online teaching environment at the home office. As the situation around the world evolves rapidly (I am writing this comment on March 16) and many schools have already or will very likely close their campuses not only to students but also to faculty, this will be the default option for many.
Wherever I could find advice from people who are more knowledgeable than I am on a given subject, I link to their work. There is no need to reinvent the wheel. Also, in this post, I focus mostly on the software and hardware environment for quick setup, but we all know that teaching online is much more than that. It is how to move your material into a format that will work online, which elements to remove, add, or change, and how to counter fatigue and engage students. Particular solutions to those problems depend a lot on the nature of the course, the personality of the instructor, and the number of students. Here, I chose to simply link to excellent articles already in existence.
I also want to say up front that I have chosen to list specific hardware by name and model. This is not to advertise these products (I get nothing out of this), but for many of my less gadget-obsessed friends, these recommendations can save a lot of time. You can lose an entire day looking for the perfect microphone (I've been there and done that) or waste money if you buy something that is not adequate.
Setting up a ZOOM lecture
First, a great 22-minute video by dottotech showing how to use Zoom for online teaching. It goes through all the settings and shows how to set up a meeting. It is pretty detailed and discusses the pros and cons of some of the options. The author then walks you through how to handle the presentation and class participation. Please mind that the full set of meeting controls is available only when you log in to your Zoom account through the browser, not the desktop app, which has a simplified interface.
In a nutshell, I recommend your ZOOM setting to be: Host Video ON, Participant Video ON, Computer Audio Only, Join before host ON, Require Password when scheduling meeting, allow Waiting Room, Mute Participant Audio ON, Chat ON, Private Chat OFF, Sound Join and Leave – Host-Only, Local Recording OFF, Co-host ON (if you have a TA), the rest I would leave in default. But feel free to play with those.
A few words on breakout rooms. This is a great feature but requires all participants to have accounts. It won’t work if your participants log in with the web app so you need to ask all the participants to install the Zoom app on their computer and open a free account. With that done, you will be able to break the class into subgroups, either automatically or manually, which is great if you have fixed groups. You can visit the groups, message all groups, and have each group ask for help individually. Here is a link to more information and a great video tutorial from Zoom. You can also pre-assign participants to breakout rooms, but you will have to ask them all for their account names/emails first. For excellent advice on how to make most of the breakout rooms in your course, look no further than here.
Another great feature to increase student interaction is polling, which can be done from within the Zoom app or a third-party solution. First, the Zoom option. To find out more about it, please check this site. Here is also a very good video tutorial on how to set up and run a poll in your Zoom session. Remember that you have to have polling activated in your settings.
For more advanced polling, I use Socrative. I have been using it already before and it works great. The best features are: a) free for up to 50 participants, b) can be accessed from any device through a dedicated client or a browser, c) does not require an account on the side of participants, d) many types of polls and features. Here is a good video introduction to Socrative and a good video tutorial on how to use it. One tip: ask students to provide their full names, with the last name first. It is much easier to grade afterward if you use it for that purpose. In fact, you can specify in Socrative which answers are correct and all you need to do is copy the final score.
Here are a few more good sources of information on Zoom
Quick advice on how to become an online teacher
Bill Schiano and Espen Andersen, authors of the excellent "Teaching with Cases" book, have also published an article titled Teaching with Cases Online. There is a lot of useful information there, including preparation, managing energy and participation in the classroom, the role of a TA in an online course, and more. Highly recommend reading it.
Harvard Business Publishing is running an excellent series of articles on moving to teach online. Check out their Inspiring Minds section, particularly:
Harvard Law w School has an amazing website with tips and FAQs on teaching online with Zoom and covers many useful topics. I highly recommend reading it. It is one of the best I've seen.
Here is some further good advice on how to prepare for an online class, how to run the class, and how to communicate with students.
Hardware
Your options here depend on what you already have and how much budget you are willing to spend. If you are simply giving a lecture, a laptop with a good camera will do fine. However, when you teach with cases, lead the class discussion and thus need to interact a lot with your students, the bar goes higher.
The main mantra here is screen real estate. You want at least two screens to see your presentation and participants at the same time. A good camera with a good built-in microphone is also highly recommended. Furthermore, a laptop or tablet with stylus support is another great asset giving you a virtual whiteboard. You can either use Zoom's whiteboard, other writing software or insert empty PowerPoint slides to write on (my favorite solution).
Finally, a good and stable Internet connection and a WiFi signal are a must. The minimum bandwidth for Zoom to work is 600kbps (up/down) and the recommended speed is 1.5 Mbps (up/down). If you are planning on using 1080p HD video, you should have 3.0 Mbps (up/down). You can check your Internet speed connection here.
Below I show three potential setups. One is more basic and the other is more advanced. As far as student experience goes, don’t skimp on equipment and software, and practice the options, functionalities, and the interface.
Option one: laptop with a stylus input only
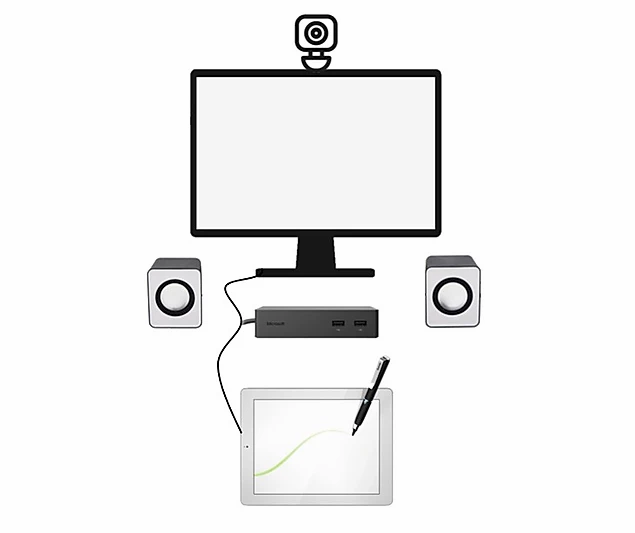
The laptop/tablet is connected with the Zoom Pro account (the meeting host)
If the computer has at least an Intel i7 quad-core processor (the top of the line 2019 Surface Pro has it) it will allow seeing 49 participants in the gallery mode at the same time, 25 otherwise. This is expensive, however. In Europe Surface Pro with i7 costs about 1,400 Euro, plus 170 Euro for a docking station, plus about 220 Euro for a cover keyboard and a stylus.
The laptop will need a docking station or a USB hub to allow for more connectivity (camera, remote clicker if used, keyboard, external microphone, etc.)
The external display is necessary to allow viewing the shared screen and the participant gallery at the same time. With a lower spec computer, you can only see up to 25 participants at once, but you can scroll through the gallery screens. You can use your TV for that purpose too. Most modern models have an HDMI input.
A good external camera. I recommend Logitech C920 or Logitech C922. C922 is more expensive but performs better in low light. Both will give a clear video feed and have good microphones. If you want to go higher still, Logitech BRIO is probably the best camera with a USB interface that you can buy right now. It has 4K resolution, HDR, 90-deg FOV, Windows Hello support, and very good microphones. You can immediately tell a difference, especially in a low-light situation or with high contrast. To get something better, you would have to start hooking up more professional digital cameras and start fiddling with more advanced settings.
External speakers or headphones. The safest bet are earbuds to eliminate any possibility of interference. However, some may not like the cable dangling or find them distracting. I have been using external speakers with easily accessible volume controls that work well. Whatever you do, make sure to test it first before showtime.
Quiet Bluetooth or wireless keyboard. Surface Pro has its own Keyboard Cover, but the best placement for the tablet is flat on the desk just in front of me for easy stylus input and the keyboard gets in the way. I am using Logitech K400 wireless. It is cheap, quiet, and also has a decent trackpad. I keep it on the side.
One note on an external microphone; unless you are doing recordings of parts of lectures, the microphone in the Logitech camera is good enough. The sound gets compressed anyway. However, if you want to make sure your audio is clear and best quality, check the setup below.
Option two: A computer with dual screens and a laptop with a stylus input

Computer 1: the main unit
The main unit with your Zoom Pro account open (the meeting host)
This computer should have at least an Intel i7 quad-core processor to allow a 49 participant view. Again, with a lower spec computer you will be able to see only up to 25 participants at any given time, but you can switch between the gallery screens. With two independent computers, however, a few things become easier. First, you can manage the session without disturbing the presentation. Second, managing and participating in a chat. Third, running live quizzes and other software (e.g., class simulation exercises).
This computer should have at least two displays to allow seeing the shared screen (from your second computer) and the participant gallery in full size.
A good camera (I recommend Logitech C920 or Logitech C922). I recommend placing the camera between the screens and at eye level.
An external microphone is optional. Rode makes a nice and discrete Lavelier Go model if you want to minimize background noise. If you want to go a little bit higher (in terms of price and quality) RODE NT-USB or Blue Yeti are excellent choices. Generally, avoid omnidirectional microphones as they pick up too much noise.
External speakers or headphones
If you are teaching in a noisy environment (neighbors, children, dogs barking, etc.) your solution may be a headset like the ones used in call centers. Jabra Evolve 65 mono is a good Bluetooth model with a day-long battery.
A quiet keyboard
Computer 2: stylus input and presentation sharing
This is the computer which will be used for sharing presentations and handwriting. I recommend either Microsoft Surface Pro or Microsoft Surface Go, both with a stylus. You can also use an iPad for that. Here is a very good 5-minute video from WP Elevation showing how to run a presentation with an iPad and a Macbook.
Connect with a Basic Zoom account in participant mode. This unit will share its screen with participants.
This unit joins the call with video off, microphone muted, and sound off to avoid interference.
[UPDATE] I personally stopped using multiple Zoom accounts after finding virtual camera software. Now I can connect my tablet to the desktop computer and connect input from all devices with only one Zoom account. See my other post for more details.
Option three: or Option two +
I personally use this option, which builds on Option 2, but adds one more connection - a smartphone connected with a third Zoom basic account to the session. It performs three important functions: a) it shows what participants are seeing, thus allowing to confirm that polls are working, who is active speaker, etc.; b) acts as a teleprompter by displaying your slides right under the camera; c) focuses your eyes on the camera so that you maintain the eye contact with the audience.
[UPDATE] After switching to the virtual camera software, I no longer use my smartphone. Instead, I now have a teleprompter connected to the tablet, so that I can see the slides and what is going on the screen.

I would also encourage you to look for a TA. You can select in Zoom to have multiple hosts and thus you can give the co-host privileges to your TA. Other than performing regular TA duties, he or she can help you with greeting students when they arrive, answering technical questions, and muting student microphones when they are done speaking and forgot to switch off.
Finally, good lighting is essential. I use two Raleno LED boxes. They are relatively inexpensive, provide good lighting, and you can regulate the intensity and color temperature. You will also need tripods for the lightboxes and camera.
If you don't have a tablet with a stylus, but would like to use something to take notes for students, an opened google docs document or MS word may do just fine.
Stay tuned for more.
UPDATE 2020/03/15
One of the questions I got was for advice on solutions for when you only have a laptop.
First, use natural light in your place to provide lighting. Face the window and avoid having bright light behind you. Otherwise, it will look like you are in the witness protection program :-)
Make sure the wifi signal is strong where you are planning to be working from. Update the software and disable pop-up notifications in your system. Test your Internet speed.
Then, if you have some budget, I would first get a second monitor. These are fairly cheap with many good products from major brands in the below 100 Euro/USD range. Seeing the class participants is super useful and it also makes it feel more like a real classroom. You can also use your TV. The new models usually have an HDMI input. All you need then is a cable.
Second, I would get an external camera to improve the video and sound quality for the participants. Third, if your laptop doesn't have stylus input, I would get an iPad Pro or Surface Go (the basic model will do fine).
UPDATE 2020/03/17
A couple of tips and useful options deep in the Zoom settings page
Start participants with their microphones muted, but let them know that when they press and hold the Space bar, they will temporarily turn their microphone on to speak. It is an easier solution (unless you are in a chat window :-) and students won't forget to mute back their mics.
In the settings, you can turn on Attention Tracking. This option allows you to see which participant has an active window that is not Zoom. While there may be many legitimate reasons for the student to switch away from Zoom (to check a certain term on Wikipedia, for example) it may be useful. UPDATE: As of April 2, 2020, this option is no longer available.
Turn on the option that says that only authenticated users can join. That means that each person has to have the Zoom Meeting Client installed and be logged in, which then makes the use of breakout rooms possible.
Turn on co-host in Zoom to allow your TA to help manage the session (monitor the chat, mute students if they forget, solve technical problems, and more).
Make frequent breaks (every 45 minutes). Use this time to go through the chat and note any questions that you might have missed and after the break answer those before continuing with the material. This will increase student engagement by showing that you are paying attention.
Ask participants to check their Internet speed before the session and report back if they have less than 600 Mbps up or down. You may consider allowing those participants to turn off their cameras or allowing voice over the telephone if there are many with a bad connection, but that last should be reserved for genuine emergencies.
UPDATE 2020/03/26
A checklist for before your online lecture
I never underestimate the power of simple checklists. They help me to offload all the small but important details so that I can focus on my material and students. I acknowledge that some points below are very trivial or address situations that are highly unlikely to occur, but it is part of my pre-teaching ritual that keeps me calm (-ish). I get quite stressed before teaching, whether in-person or online.
Here is the list I follow each time. I would be happy to hear from you about what’s in yours that is not on mine.
Check if all the materials are ready and loaded on the computer and the tablet (if you are using one). This includes slides, websites, simulations, videos, polls, etc.
Turn off any unnecessary software (your personal email, calendar, Twitter, etc.)
Mute the phone and turn off vibration, or even better, turn it off. You don't want Siri joining the conversation :-)
Confirm I have a clock visible somewhere to check the time. When Zoom goes full screen, it hides the system's clock.
Put an ON AIR sign on the doors to your room and tell my family I will be teaching and until when.
Turn on the lights and lightboxes
Confirm that the computer(s) is plugged in and not on battery power and won't run out of juice mid-lecture.
Confirm in the audio settings that the microphone and speakers are set to what I want them to be. Do a microphone and speakers test to verify they are both working.
Confirm that I have support for Dual Monitors turned on in Zoom
Do the same for the camera in the video settings, make sure I am well visible in the shot.
Confirm I am using the right virtual background (if you are using one) and not the funny one I used in your call with my friends yesterday.
Confirm I have my teaching plan, student list, any other teaching notes within reach.
Verify I have a paper notepad, colored pens, and post-it notes for quick note-taking.
Confirm I have a stylus ready (I also always have a second one just in case), and if the keyboard and mouse are working. This is especially important if you are using a wireless keyboard for the tablet that requires a wireless adapter to be inserted into the tablet. I also keep spare batteries nearby just in case. I know, this looks like an OCD, but it keeps me calm.
Make sure I have water to drink within reach. I use a bottle for runners that has a drinking valve to minimize the risk of water spilling on my keyboard or worse.
Relax and smile. Some mistakes will be made, and software and Internet connections will crash occasionally. If those unfortunate events can be prevented next time, put a note on your teaching checklist, if not, it is fine, we are not perfect. Students will appreciate any effort you put into your course anyway.
UPDATE 2020/09/21
If you want to make your online sessions more interesting and fun and are frustrated with the limitations of Zoom in terms of visuals, check out my post on virtual camera software.